Friday, August 7, 2015

CONFESSION

At the end of last year I cleaned out my closet and found so many unused centers, work jobs, and manipulatives that I have made over the year I swore to myself that this summer  I would not make anything else new and use what I already have.
That lasted about a month.
I honestly love creating new things and could do it all day everyday.

So here is my latest. My good friend, Mrs. B from kindergarten requested some easy reader flip books that concentrate on color words and a few sight words. I am so excited to share these books with her and you. These little 'flip books' are a great way to both introduce and review colors and color words to your early emergent readers and writers!


The pack includes 10 Color flip books and 10 I See Color Flip Books in color (teacher and small group books) and black line (student books). I have also included some blank books for writing practice.


For children who want to make their own book there is a blank book included for them to write the sentence and draw their own picture.

Click on the picture below to get your Color Flip Books and download a free preview.

 Color Flip Books

Enjoy the rest of your summer!


Wednesday, July 15, 2015

Posting once a year. Sad but glad to be back.

OK as my two devoted followers can see writing a blog is my super favorite thing to do nemesis.
I hope you all have been enjoying your summer as much as I have! I love creating things for my classroom.
My latest is Pete's Shoes and Buttons. It is styled after the Chutes and Ladder games where you can move ahead several spaces or go backwards.


Children move their pieces around the board (my pieces are different colored bears cause well we are the bear class). If they land on a square with a road then they can groove on up the road to Pete's shoe and a new square. If they land on a square with a spiral then they follow it down to Pete's popped off button and a new square. The first one to reach Pete's heart wins.
Pretty simple, right?
Well to make it a more diversified game it can be played 3 different ways depending on the objective the child needs to learn or review.
Included with the game is a simple colored spinner. 
1.Children spin, identify the color and move to that color on the board. 
2. They can roll one or two dice and move the total number of squares shown on the dice roll. 
3. Also included with the game is ABC and color cords. The child chooses a card from the top of the deck, names the letter or sound and if correct moves to the next colored square shown on his card.
Something for everyone!!!
And for fun I stored it all in a pizza box!


To get your very own Pete's Shoes and Buttons game click here.

Hope you enjoy this game and yea..............I am shamelessly promoting. Just sayin'


Sunday, August 3, 2014

 PreKBearPaws
Who doesn't love a sale?
For 2 days my entire TpT Store is on sale for 20% off!

Get Assessment tools, math centers, Pete the Cat Pocket Chart Games, Zip It Games, and so much more!


Thursday, July 17, 2014

This is simple instructions on how to print on the cutout stationary or accent packs you find at stores from Dollar Tree to teacher supply stores.

I wanted to make a new job chart to go with my bear themed classroom. I had these cute bear cutouts which are easy enough to write on but I have the worst printing of all time and always prefer my computer to print things out.

Supplies:
  • Cutouts
  • Post-It Notes
  • Scissors
  • Computer and printer

First of all take your cutouts and lay them on a letter sized piece of paper. This gives you an idea of how many fit on a page. Two of my bear cutouts fit on a page. I then used Microsoft Word and just kind of guessed where to print the words. This isn't scientific at this stage. Print.

What you need now is just the sticky part of the post it - approximatly 3 or 4 per cutout. These will be the tape that holds the cut out on the paper. Post-it notes work much better than tape as they are easy to remove without damaging your cutout. Lay your cutout on the words and hold both up to light if needed to line it up. Use the post it notes to tape the cutout on the paper making sure not to block the area you want to be printed.


Send this sheet back through your printer and ta-da your cutout has been professionally printed. Here are some of mine completed.

I'm  very happy with them! I will put clear plastic pouches under each one with the children's name in the pouches.

Hope this makes your preparations for the new year easier. Let me know how you used this easy printing method. (yea I'll beg here..............someone talk to me, please!!!)


Wednesday, July 16, 2014

Posting Two Days in Row

Lookout! I'm either getting this blogging stuff down or I'm way bored.

Slept in late today - isnt that the best?! Went to school to look at the banner my dance team girls will carry when they march in the Fort Bend parade. Banner is just a tad too big-(rolling of eyes) - it fits on the side of a building. Looks like my girls will get to create our own banner. Fun!
Been cleaning out my garage where everything for school and then some is stored with the intention of giving away all the things I don't use or haven't used in two years. Yea that's going well (more rolling of eyes). It's more like Christmas, "Oh boy I forgot I had this. I must keep it and use it."
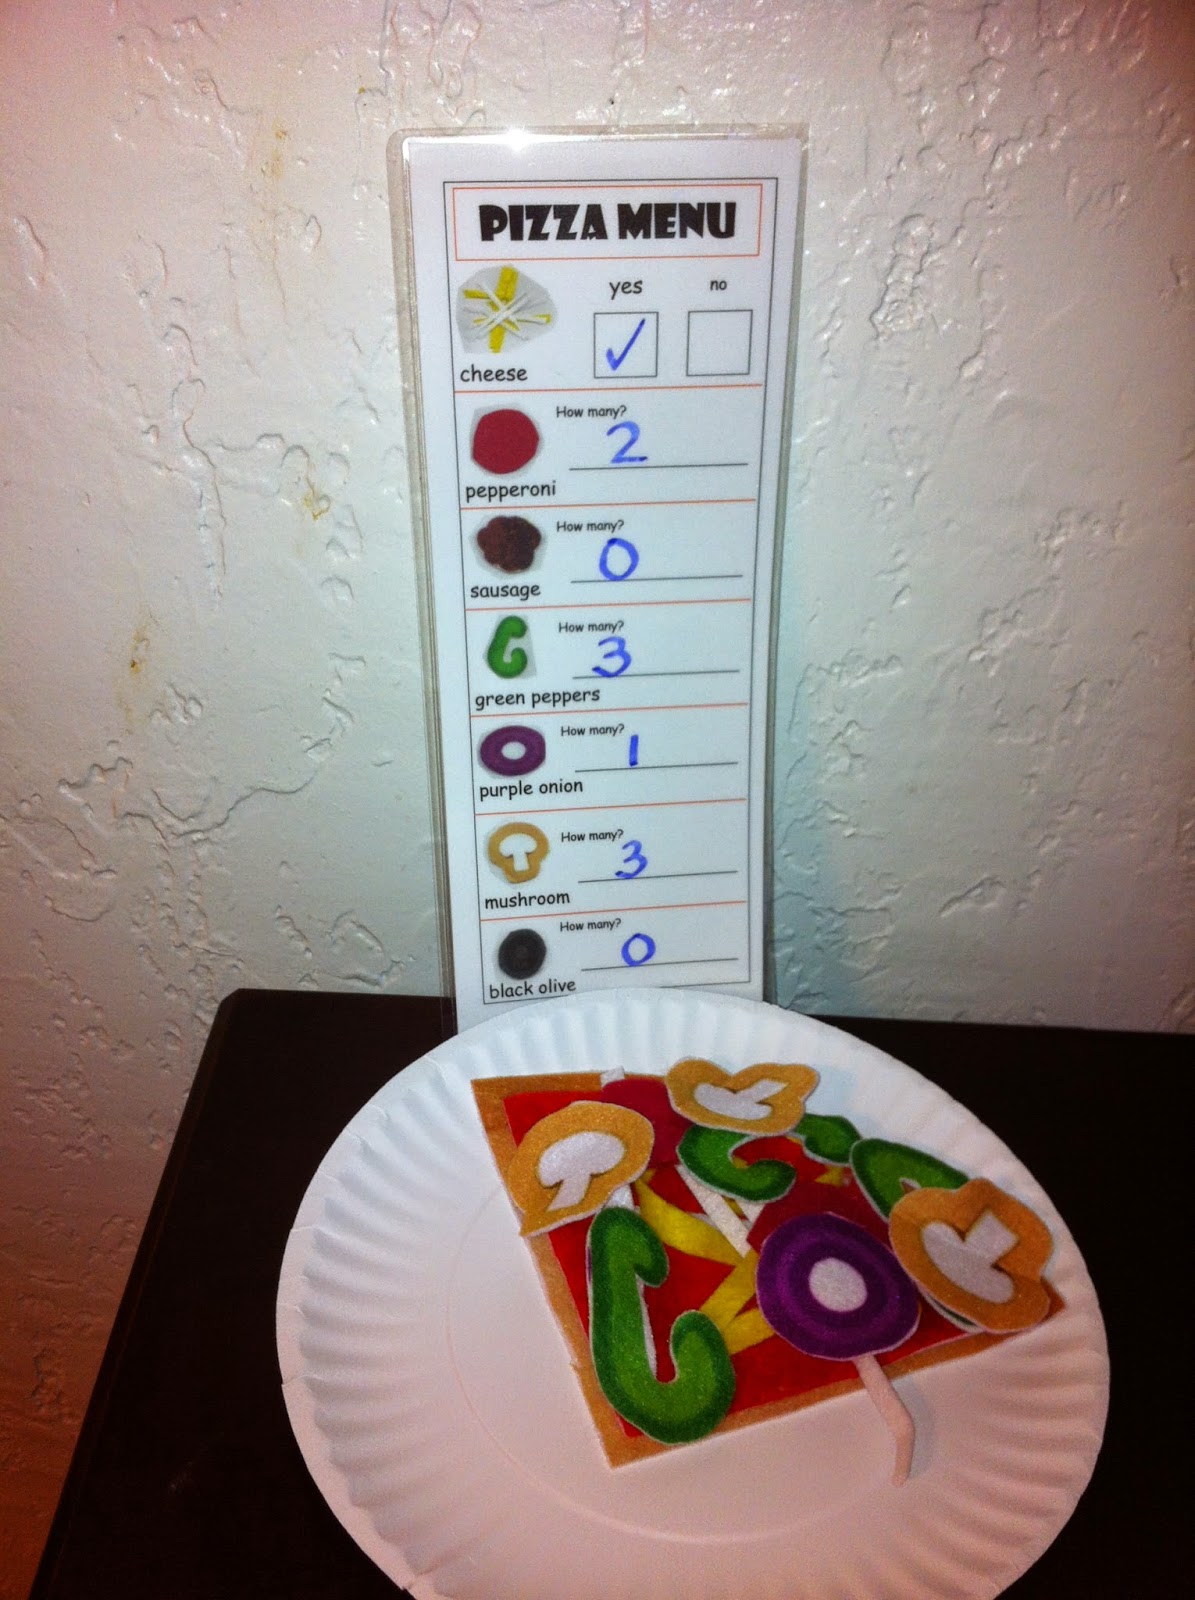
One of the things I found and almost gave away was a felt pizza set. It came with a large round crust, red round sauce, mushrooms, sausage, green peppers, onions, and olives. Pizza needs pepperoni so I cut some out of red felt and also cut some white and yellow strips of felt for cheese. I cut the crust and sauce into quarters.
I then made a menu and laminated it. My plan is for the kids to fill out the menu by checking the box if they want cheese and how many of the items available they want on their pizza. Another child or two will be the cooks and have to create their order folloing the menu.
Lotsa math happening here - writing numbers, reading numbers, following directions and working with parts.
If you want a free copy of my menu go here. It's a direct link to download - not go to TpT. I dunno - it's sometimes so time consuming adding things to my TpT store - so much to fill out. Anyway it's still available and still free. Leave me a comment if you like it!

Well that's all there is folks cause So You Think You Can Dance is on.


Tuesday, July 15, 2014

The Cutest Pinterest/Blog steal ever!  

Hi all.
I was wholeheartedly indulging my addiction aka as surfing Pinterest and found these adorable decorated supply buckets. Of course they are from the very creative and talented Maria from Kinder-Craze. Well you just have to jump over there and check them out cause she is giving a set away!
She also has DIY instructions. Her instructions are very well written but I don't have a Cricut so I made my own using Washi tape and some huge neon colored labels that I found on sale. The labels can be computer printed so that's fun choosing which font to use. The paint buckets are from Michael's.
Here is my version which I will use to keep the class supply of markers and thin markers. If Micheal's had more buckets I would rush out to buy them all up. The other bucket will be on my shelf to hold my fancy pencils and pens - I need a pic of the pencils and pens because they are a very successful form of reward. When they sit and listen or share things etc. I let them choose one of my fancy pens for writing practice. - Hey new blog post idea!

I don't think instructions are needed but I did want to let you know that the labels are Avery 5168 - there are 10 labels to a sheet and Office Depot had them on sale.

Thanks Maria for the inspiration!

Oh a quick PS - I had a dickens of a time getting them open. I was grunting and groaning, turning up to the light to see if it was taped - pretty much providing my hubby with a lot of comic relief. I think he might have even dampened his Depends he was laughing so loud and hard. After he recovered from his head injury laughing he showed me how to open it- just as any paint can is opened. Just put that little silver thingie that actually comes with each can inside the rim and pop it off. Here is a pic to help any of you out who are also a tad paint-can-opening impaired:


Thursday, July 10, 2014

Hellooooooo blog world!

Top ten reasons I like summer:

  • 10 - I get to watch all the lady shows like Wendy Williams (How ya doing?) and Ellen (the whole audience is taking home...)
  • 9 - I love the sound of cicadas
  • 8 - leisure lunches with my friends who I don't get to visit with much during the teaching year
  • 7 - shopping! (yea yea I know I can do that during the year but I love it so much I had to list it here)
  • 6-  more energy for my dancing hobbies
  • 5- clean house (achhhhhhhhh my pants are on fire!)
  • 4- lazy mornings staying in pajamas till evening, errr  noon errr 10am!
  • 3- family vacations
  • 2- sleeping late
  • and the number 1 reason I love summer is.......... Having time to make stuff and more stuff for my students and classroom!!!!!!!!!!!!!! I am one with the Velcro. 

The one thing I am most excited about is something I have been mooning over on Pinterest forever - scrapbook paper covered sterlite drawers! You can't see the sides too well but they are covered in yellow striped paper. Check them out!

Like my color scheme for this year? This idea came from Maria at Kinder-Craze. She has detailed step by step instructions on how to make a template. You need to pop on over there and see her awesome blog. 
In all honesty though, I didn't follow her instructions exactly. I used small note pad paper and laid one small piece at far left top part of the drawer and used my fingernail to crease the paper. I cut it out and then used another small piece going left to right and taping the pieces of paper together as I went. It took a lot of trial and error but hey it's summer and I had fun making it.

OK what else I have been un making are some fun math centers. Last year I made this one for color matching. It turned out to be one of the kids favorite choices. 
Crazy Colorful Matching
The kids choose a picture and match it to the correct color card. The real challenge is once they finish matching all the pictures to the correct color card they have to put all the pics back in random order - in other words all the red pics cannot be together. Believe it or not this is a challenge for my kiddos.
Well with the success of this one I have spent some days making several more for math centers. They cover shapes, colors, and numbers 1-10 and can be used all year.

As you can see I made them in 1" folders but you can just use them as math mats.
All the above games are available for your classroom too! Just click on the picture.

Make sure and let me know what your top ten list reasons why you love summer!


Sunday, September 22, 2013

Getting to Know My Kiddos


My first two weeks  month is over and we have had a wonderful time getting to know each other. (wow it has been weeks since I started this draft and have not visited since.)Yikes - I wish I had a funny quip to explain myself!. I have been extremely busy - as you all have - but I am glad to be back posting.

One of my class' favorite books this year is Press Here by Herve Tullet
This book is full of surprises. As you follow the instructions pressing, tapping, blowing, and clapping the yellow dot changes colors, multiplies, and grows.
We have read this book so often in my class it is getting worn.

As a compliment to this book I wrote two interactive books: Tickle  Monkey and Building Jack.
Both books require the reader to press, tickle, blow kisses, rub, stretch, clap, tilt, and shake the book.
Click here to get your Tickle Monkey book.


How do you build a jack-o-lantern? By pinching, swiping, clapping, and shaking the book among others.
Click here to get your Building Jack book.


I hope you all are enjoying your year so far.

PS I still haven't thought of anything clever.


Sunday, August 25, 2013

First Week down.

Wow my first full week of school is over and I am exhausted. So glad to have 2 days to regroup and relax. 

I just have to ask my whole two followers out there... am I the only preschool teacher who feels totally inadequate at the end of the first week? No matter how much I tell myself and intellectually understand that my class at the beginning of the year is NOTHING like my class at the end of the year I always forget how large that difference is. I did remember to take it slow, do lots of modelling, do lots of modelling again and laugh a lot but those small (feels like huge) behavior problems just knock me for a loop. I know it will all get better - it will won't it? :-)

Another reason for my exhaustion is the week prior to school we had our all school inservices. I was totally honored to be asked to give a full day inservice on Literacy and Math workstations for our preschool teachers. I worked so hard preparing all the workstations and my 6 hour session and then was so nervous I almost made myself sick. I was so relieved when it was over and all my friends/co-teachers enjoyed it and were totally excited to get a stack of workstations and my interactive big books ready to go for Monday morning. 
Also during the summer I did a book study of Debbie Diller's book: Math Stations. One of the best ideas I got from the book was using assessment cards for quick and easy assessment. Debbie uses index cards, adds the children's names to the bottom and then arranges them on a clipboard. This is a picture I got off Pinterest that shows an example:
Great informal assessment tool.  This idea was taken from Math Workstations by Debbie Dillar.
I made some of my own and pre-programmed them with upper and lower case letters so it will be easy to mark each child's progress.

To celebrate the success of my workshop and the end of the first week of school I am offering an assessment pack with two easy and fun-to-play games for you all! It contains literacy assessment cards (cards have upper and lower case letters as well as letters to mark for sound knowledge with space for comments), math assessment cards (numbers 1-20 on each card with space for comments) PLUS 2 games that can be adapted to any objective! This pack fulfills several CCS. Click here for yours.


Hope to hear from someone...........anyone.... 


Sunday, August 18, 2013

Back To School

Hi all,
I have been gone from the blog world for a long time I know but I have been so busy (just like the rest of you) decorating my room (and recovering from a ton odf dental work but that's another bloggin' story). I also gave my preschool a day long inservice with make and takes and plenty of ready to go workstations. The inservice was well received and all my fellow teachers taught me things by sharing their ideas. It was a wonderful day.
In celebration of the successful inservice I am offering Pete The Cat's Colorful Shoes Pocket Chart Game. Scroll down to see more on this fun game.

Here are some pics of my room. Our themes is Pete the Cat.

Our bulletin board which will hold their art work throughout the year. I love the buttons which I hot glued to clothespins to hold their papers.

This is my "We Know All About Numbers" chart. I have the 10 frame and tally part covered for now. We will do this part of the chart later as we learn about 10 frame and tally marks.

It doesn't show to well in this picture but I also made a Pete The Cat job helper chart. Pete says, "Helping is groovy!"
These hearts will hold all our weekly Bible verses as we learn them. Stickers are put on the front of each heart as they recite the verse at week's end.


This game was previously named Pete the Cats Colorful Shoes. Same great game- just new name


This fun game can be used with your preschool class to help them learn and review their colors. Ten colors and the repetitive poem make this a fun game for all. It is also an easy assessment tool for you! The game was meant to be played on a pocket chart but can be just as easily used on a flannel board.

I wish you all a wonderful first day and successful year! Happy Teaching!


Tuesday, August 6, 2013

GOLF PANTS COLOR SCHEME

Well we officially start school next week but I went into my room today to start setting up. Of course I started with putting paper on my walls. I actually love putting up paper although I don't know why since I am level challenged and I am always having to take out a staple and readjust. That is until last year when my assistant suggested I use push pins to position the paper until it's just right, or in my skewed vision straight enough, and then go crazy with the stapler.
I went with a dark blue and yellow paper scheme. My class is the Bears so on two of my walls I used the colorful bear paws border. Then I guess I was bored with bear paws so I went digging into my large tub full of borders and found a red polka dot border that I thought would rock with the yellow paper and red polka dot letters I have (this is going to be my word wall.) I was having a great time - singing and dancing while I subconsciously congratulated myself on being a designer of the Martha Stewart kind. Oh yea - it's a good thing!
 I was very excited when I finished and was loving the bright colors. That is until I left the room to get some supplies and walked back into the disaster. What happened to my (in my mind only) awesome color scheme? And how did red polka dot border turn into hot pink polka dot border? I swear I heard a thump similar to what Martha sounds like when she faints. Yea, Martha, your job is secure.
Here is my wall. Check it out while you can because tomorrow I have an emergency appointment at the teacher supply store for some new border.
Any suggestions?
Worse than golf pants (no offense, Tiger)

I'll post more pics tomorrow. Ya know, before and after. 
Have any of you ever hated your color scheme? Please post and tell me about it.

Happy decorating!


Wednesday, July 31, 2013

Birthday Rocks

Birthday Rocks


Ha ha I just read that title and thought, yea birthdays sure do rock! But I didn't mean that kind of rock- I meant this kind:
For the past 2 years I have given these out as birthday presents to my students. My daughter used these rocks as part of her centerpieces at her reception and I have tons in the garage. Great way to reuse them and I probably have enough till retirement.
All you need are smooth floral rocks (for those of you that are garage-full-of-rocks impaired you can buy a bag for $1 at Dollar Tree), some stickers (these are scrapbook stickers), mod podge and sealant.

I use my thin permanent marker to write "Love, Mrs. Drake and Ms. Lisa" on the back of each rock.
Then place a sticker or two on each rock.
Mod Podge both sides and spray with sealant. 
I have to admit this is very little effort for big time return. My kids LOVE getting to choose their birthday rock and use it as weapons on their friends lovingly save it to show their mom.

If you decide to make some of these send me some pics! I would love to see yours.

Leave me a comment below on how you celebrate your students birthdays.